In addition to the regular space that we use every day, simply inserted by pressing the space bar, Word also has other space-like characters that can be really useful when formatting your proposals or other technical documents. In this article, we look at the other space options that are available.
The Non-Breaking Space
The non-breaking space is very useful to keep strings of characters or words separated by spaces together and prevent them from breaking over the end of a line. Examples include dates, e.g. “12 December 2016.” You can easily enter a non-breaking space by pressing Ctrl+Shift+Space. If you have Show/Hide ¶ on (press Ctrl+* to toggle), Word displays a non-breaking space as a degree symbol, °.
The National Institute of Science & Technology check list, item #15, specifies a space between the numerical value and unit symbol, e.g. 100 kW. You should use a non-breaking space for this purpose. If you have a negative numerical value, e.g. −10 dBm, do not use a standard hyphen for the negative symbol, as the hyphen symbol will not ‘stick’ to the following number, and can be left at the end of a line, with the number on the next line. Instead, use a minus symbol, which is the same width as a plus symbol, and will stick to the following number. You can easily insert a minus symbol by typing its Unicode value, 2212, and then pressing Alt+X.
The Zero-Width Space
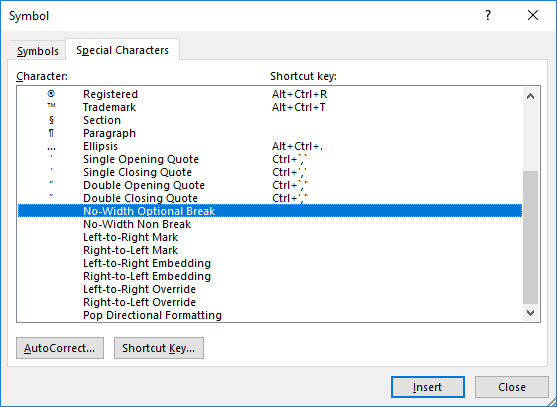
Called the No-Width Optional Break in Microsoft Word, the zero-width space is useful for breaking long strings of characters that include slashes, such as website URLs (Uniform Resource Locators) or word combinations such as “and/or.” You can insert a no-width optional break in a Word document by going to Insert > Symbol > More Symbols. Word displays the Symbol dialog. Select the Special Characters tab, scroll down to No-Width Optional Break, and then click Insert:
If you have Show/Hide ¶ on, Word displays a no-width optional break as a white box within a white box:
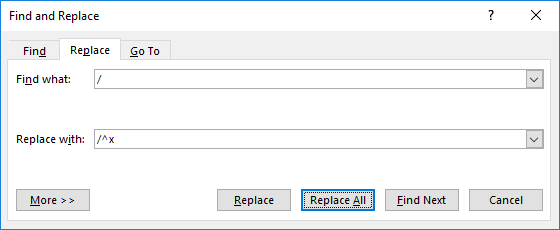
You can also use Word’s Find and Replace function to insert no-width optional breaks after the slashes in your document. Press Ctrl+H to display the Find and Replace dialog. Enter a slash in the Find what box, and enter a slash followed by ^x in the Replace with box:
You can now step through each occurrence of a slash by clicking Find Next, and then clicking Replace to insert the no-width optional break, or Find Next to skip that occurrence and move on to the next slash.


