
5 minute read
Image: Wordman Speaks
July 29, 2020
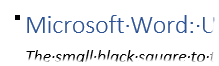
The small black square to the left of some paragraphs in a Microsoft Word document, aka the Paragraph Properties Mark, can tell you a lot about the formatting applied to those paragraphs.
By Dick Eassom, CF APMP Fellow (aka Wordman)
In 2006, I wrote an article for my Wordman’s Production Corner series in the Perspective newsletter, published by the Association of Proposal Management Professionals (APMP), titled The Curse of the Black Spot[1]. This was based on a question from a Perspective reader regarding the meaning of the small black square that Microsoft Word will display to the left of some paragraphs in a document when you have formatting marks turned on. Here’s how it appears if you press Ctrl+*, or click Show/Hide ¶ in the Paragraph group on the Home ribbon tab:
So, what does this small black square signify, and does its position relative to the paragraph text mean anything? Like so many features in Word, and probably in other Microsoft products, you won’t find anything about this black square in the Help files. Nor will you find anything about it in the Microsoft Knowledge Base—normally a treasure trove of information.
I call this small black square the ‘Paragraph Properties Mark,’ although there would appear to be no evidence that this is the official Microsoft name for it. The square appears whenever one or more of the following are applied to a paragraph:
- Keep with next: ensures the paragraph is always on the same page as the following paragraph
- Page break before: ensures the paragraph always starts on a new page
- Keep lines together: ensures the paragraph does not split across a page boundary
- Suppress line numbers: when line numbering is in force, ensures line numbers are not displayed on this paragraph
To apply any of these settings, click the cursor anywhere in the paragraph, and then click the dialog launcher, ![]() , at the bottom right of the Paragraph group on the Home ribbon tab, or right-click and then select Paragraph. Select Line and Page Breaks in the resulting Paragraph dialog:
, at the bottom right of the Paragraph group on the Home ribbon tab, or right-click and then select Paragraph. Select Line and Page Breaks in the resulting Paragraph dialog:
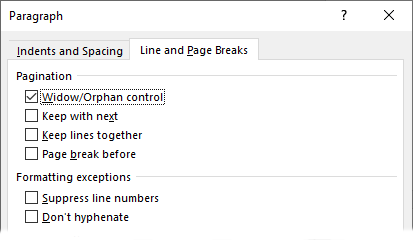
By default, Word’s Heading styles have Keep with next applied, so you will see the paragraph property mark next to each paragraph with one of those styles.
The Significance of the Paragraph Property Mark’s Position
The position of the mark relative to the first line of the paragraph is dependent on the amount of spacing before and after the paragraph. To apply spacing, place the cursor in the paragraph, and then click the dialog launcher, ![]() , at the bottom right of the Paragraph group on the Home ribbon tab, or right-click and then select Paragraph. Select Indents and Spacing in the Paragraph dialog, and then adjust the Before and After spacing:
, at the bottom right of the Paragraph group on the Home ribbon tab, or right-click and then select Paragraph. Select Indents and Spacing in the Paragraph dialog, and then adjust the Before and After spacing:
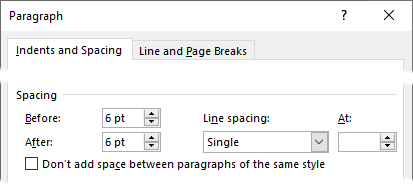
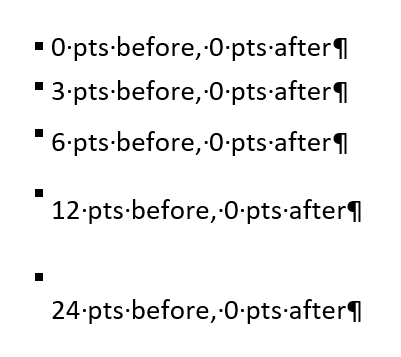
(This is a more robust way to add space before and after paragraphs compared to simple pressing Enter to add a blank line!) If there’s an equal amount of space Before and After, Word displays the black square near the vertical center of the first line of the paragraph. The more that Before spacing exceeds After spacing, the more Word displays the black square above the vertical center of the line:
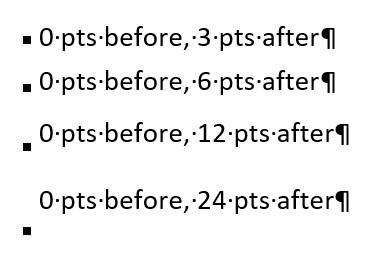
Similarly, the more that After spacing exceeds Before spacing, the more Word displays the black square below the vertical center of the line:
Displaying Paragraph Format Settings
Although Word is a WYSIWYG (‘What you see is what you get’) word processor, it can be difficult to see which style has been applied to a paragraph, and if the paragraph formatting has been modified, i.e., direct formatting. Fortunately, there is the Style Inspector. Click the dialog launcher, ![]() , at the bottom right of the Styles gallery on the Home ribbon tab. Word display the Styles pane. At the bottom of the Styles pane, click Style Inspector,
, at the bottom right of the Styles gallery on the Home ribbon tab. Word display the Styles pane. At the bottom of the Styles pane, click Style Inspector, ![]() . Word displays the Style Inspector dialog, with the underlying style of the paragraph containing your cursor, and any directly applied formatting:
. Word displays the Style Inspector dialog, with the underlying style of the paragraph containing your cursor, and any directly applied formatting:
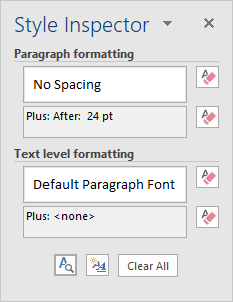
Using the buttons on the Style Inspector dialog, you can reset or clear both the paragraph formatting and reset and clear any formatting on selected text. (You can drag the Style Inspector over to the right of the editing window and it will dock like the Styles pane.) Click Reveal Formatting, ![]() , and Word displays the Reveal Formatting pane (the nearest thing to Word Perfect’s Reveal Codes):
, and Word displays the Reveal Formatting pane (the nearest thing to Word Perfect’s Reveal Codes):
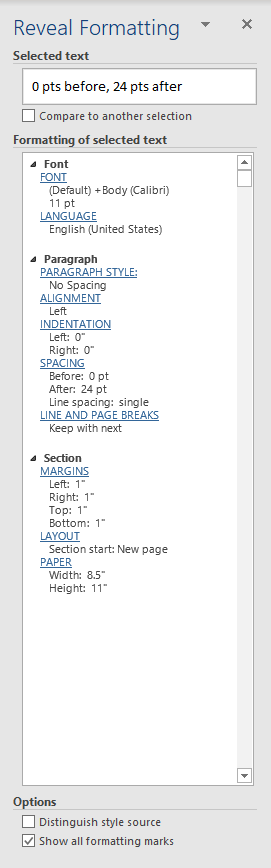
Note the Options at the bottom of the task pane. Checking Distinguish style source shows formatting that came from the applied style and direct formatting.
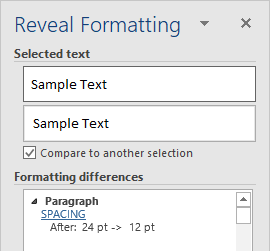
A feature near the top of the Reveal Formatting pane allows you to compare the formatting of two paragraphs. Click the cursor in a paragraph, and then check Compare to another selection on the Reveal Formatting pane. Now click the cursor in a second paragraph. The task pane shows you the difference:
 |
“Wordman’s Word Tips” is sponsored by SMA. Wordman is Dick Eassom, CF APMP Fellow, SMA’s Vice President for Corporate Support. Wordman has been providing advanced Microsoft Word help and training, and custom templates, to proposal professionals for over 20 years. You can read more of Wordman’s articles here. |
[1] APMP Perspective, Volume 16, Issue 4, 2006. The title is a reference to Robert Louis Stevenson’s “Treasure Island,” written in 1883. In the book, Billy Bones, a menacing old sea captain, is given a black spot by the old pirate, Blind Pew. The black spot is a secret pirate message symbolizing guilt and a death sentence for the recipient. Billy Bones dies of a stroke soon thereafter. The book’s hero, young Jim Hawkins, opens the captain’s sea chest and discovers the map to Treasure Island. Fortunately, Word’s “black spot” just signifies some formatting…
Posted on July 29, 2020, by
Dick Eassom, CF APMP Fellow, SMA, Inc.


