
5 minute read
Image: Microsoft (dialog), and Wordman Speaks (Wordman image)
December 16, 2024
Note: In August 2024, Microsoft changed the keyboard shortcuts for the optional and non-breaking hyphens described below. This article, originally published in June 2020, has been updated to reflect the new shortcuts, with the old shortcuts in parentheses.
End-of-line hyphenation can save space, especially in page-limited proposals, and Microsoft Word has excellent hyphenation tools. Here’s how to use them.
By Dick Eassom, CF APMP Fellow (aka Wordman)
I appreciate that there may be those of you who are already using end-of-line hyphenation, and those of who are firmly opposed to using it under any circumstances but there is no doubt that it can save space in a page-limited proposal scenario. If adding hyphenation at the end of a couple of lines in a paragraph can reduce the number of lines by only one, then that’s one line you’ve gained for more content. This is even more effective in multiple column layouts—let’s be honest, we can all read a fully-justified, hyphenated newspaper column with ease—and even in tables.
However, the rules for where you can split any given word are confusing—to me at least, or maybe I was sick on the day they covered end-of-line hyphenation in English at school! According to the accepted convention, you must only break words at syllable boundaries. If this is obvious, you can manually insert an Optional Hyphen by pressing Alt, Ctrl, and – together (previously Ctrl and –). Word only displays the hyphen if it’s needed to split the word over the end of a line. If you later edit the preceding text and the word does not need to be split, the hyphen does not display.
But you do have to know the rules regrading where you can split the word, and, to me that’s not always obvious. The Chicago Manual of Style (CMOS), for example, has some good guidelines[1] for line breaking, but, thankfully, Microsoft Word has an excellent built-in hyphenation tool.
Word’s Built-in Hyphenation Tool
You can access the hyphenation tool by going to Layout > Hyphenation:
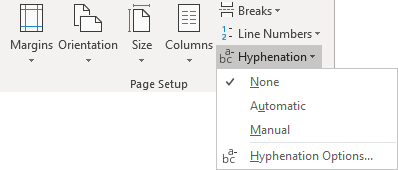
Select Automatic if you want Word to automatically hyphenate the document. I don’t recommend this as I prefer to have a little more control over exactly where I want to split words. For this, select Manual. Word jumps to the first word that can be split over the end of a line and displays the Manual Hyphenation dialog with the syllable boundary (or boundaries) displayed:
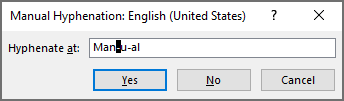
Click on the syllable boundary where you want to split the word and click Yes to split the word, click No to move to the next word that can be split over the line end, or click Cancel to close the dialog. For even more control, select just one paragraph, or even just one word, before you use the manual end-of-line hyphenation tool.
Hyphenation Tool Options
If you do want to use automatic end-of-line hyphenation, you have some control over how Word does it. Go to Layout > Hyphenation > Hyphenation Options… Word displays the Hyphenation dialog:
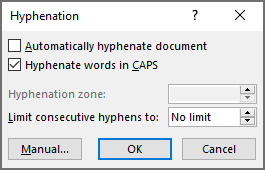
- Check Automatically hyphenate document for automatic hyphenation
- Uncheck Hyphenate words in CAPS if you do not want to hyphenate uppercase text
- The Hyphenation zone option is disabled for documents saved in the .docx format. This option only applies to the old .doc format, and controls the distance between the end of the last complete word in a line and the right margin, i.e. the degree of “ragged right” allowed
- Set a limit in the Limit consecutive hyphens to box to control the number of consecutive lines with hyphens
Non-Breaking Hyphens
There are times when you want a hyphen, but you never want it to break over the end of a line. For example, if you are writing about US military aircraft, you always want “F‑35” together, and never “F‑” on one line and “35” on the next. In this case, insert a Non-Breaking Hyphen by pressing Alt, Shift, and – together (previously Ctrl, Shift, and –).
Adding to Your QAT
When you’re doing that final edit and layout on a proposal document, you need all your tools within easy reach. Going to Layout > Hyphenation > Manual is three mouse clicks, but you can reduce it to one click by adding that feature to your Quick Access Toolbar (QAT), the short toolbar above the ribbon.
Click on the down arrow at the right of the QAT and select More Commands… or go to File > Options > Quick Access Toolbar. Word displays the Word Options dialog, with the Quick Access Toolbar tab selected. In the Choose commands from dropdown, select Layout Tab. Scroll down to Hyphenation Manual and then click Add >> to add the tool to your QAT:
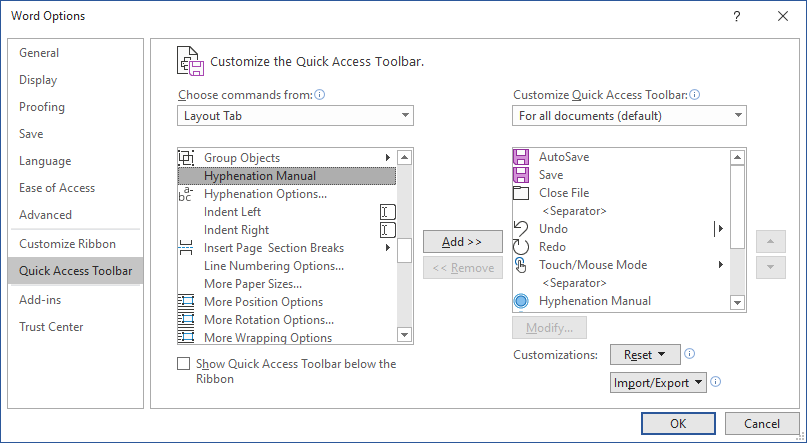
You’ll notice that the Hyphenation Manual tool doesn’t have a cool icon of its own, just a simple disc:

To add end-of-line hyphenation, select the word (or paragraph, etc.), click the Hyphenation Manual icon/disc on your QAT, and Word will display the Manual Hyphenation dialog. Have fun hyphenating!
 |
“Wordman’s Word Tips” is sponsored by SMA. Wordman is Dick Eassom, CF APMP Fellow, SMA’s Vice President for Corporate Support. Wordman has been providing advanced Microsoft Word help and training, and custom templates, to proposal professionals for over 20 years. You can read more of Wordman’s articles here. |
[1] Frequently Asked Questions (FAQs) on Word Division, The Chicago Manual of Style Online, retrieved from https://www.chicagomanualofstyle.org/qanda/data/faq/topics/WordDivision.html
Posted on December 16, 2024, by
Dick Eassom, CF APMP Fellow, SMA, Inc.


